Author Archives: marycadogan

A spring tart

After three long months without a proper kitchen, 400 tea bags, industrial quantities of chocolate hobnobs and a daily battle with dust the builders have finally left. At last I can cook again and like any addict denied their fix I am overdosing at ever turn. Cakes for the village shop- of course, friends for the the weekend, why not? And as a huge thank you for all our lovely neighbours who took us in and fed us when we were staring ready meals in the face we are having a gang of them over this week for a kitchen supper washed down with a few glasses of wine. Over the next few blogs I plan to share the recipes for the meal with you and today it’s the starter. With piles of fabulous local asparagus now in abundance this tart seemed like a no brainer. No eggs or cream, just a puffy pillow of a tart that can be assembled ahead and slipped into the oven while our guests enjoy a glass of fizz. I don’t want you to think I’m showing off but I made the pesto that I smeared under the spears with the wild garlic that grows in profusion around the local riverbanks and it’s not too late to make some for yourself if you are quick. If that’s not an option a bought pesto will do just fine. Happy days.

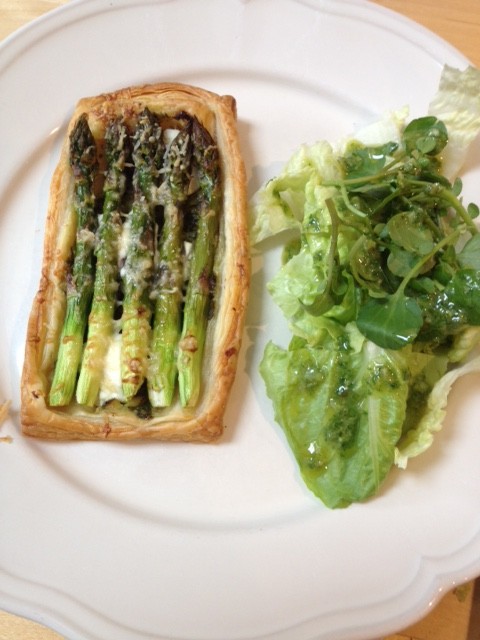
Asparagus and pesto tart
Serves 4

IMG_1601 (1)

20 fine asparagus spears
320g pack ready rolled puff pastry (I used Tesco finest-very good)
8 tsp pesto
100g soft rindless goats cheese
a little olive oil
4 tbsp freshly grated parmesan
sea salt and freshly ground black pepper
green salad, to serve

Snap each asparagus spear, it will break where the base becomes woody. Peel the end of each spear.Line 2 baking sheets with baking paper. Unroll the pastry and cut into four oblongs about 10cm by 5cm. They need to be a bit larger than the trimmed asparagus and wide enough to take 5 spears with a small margin.
IMG_1595 (1)

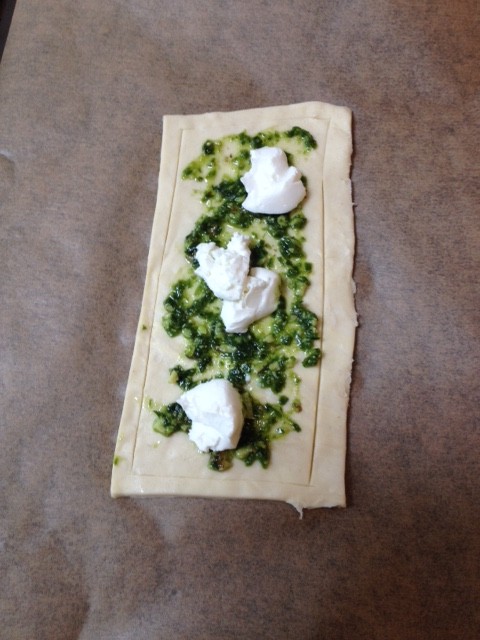
Put the pastry oblongs on the baking sheets and mark a line around each about 1cm in from the edges using the point of a sharp knife. Spread with pesto inside the marked lines and spoon over a few blobs of cheese. Snuggle 5 asparagus spears over each.IMG_1596 (1)

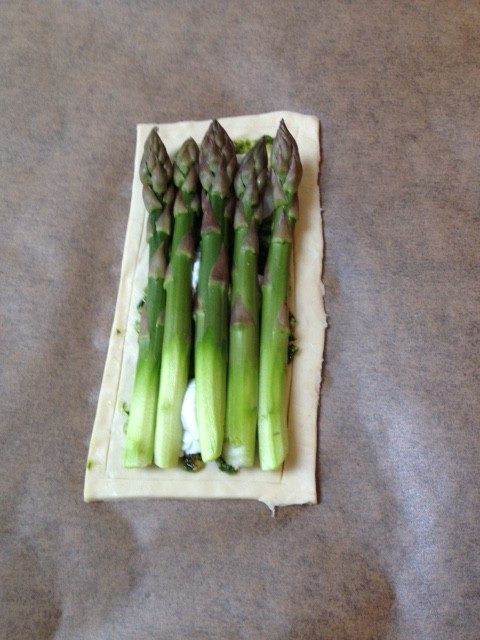
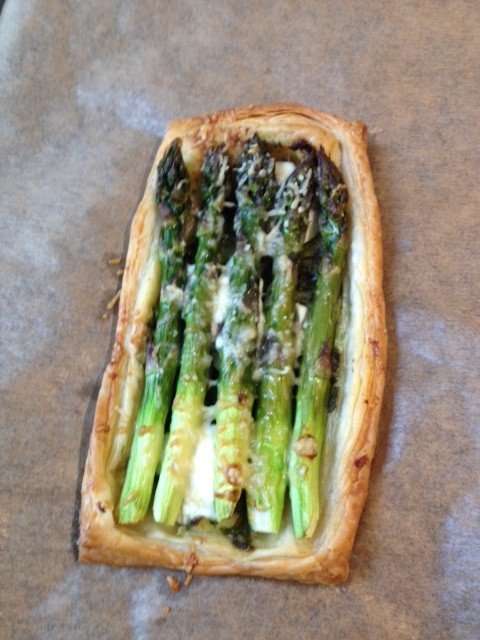
Brush lightly with olive oil and season with salt and pepper. Sprinkle with parmesan and bake for 20-25 mins until the pastry is crisp and golden and the asparagus is tender.IMG_1598 (1)

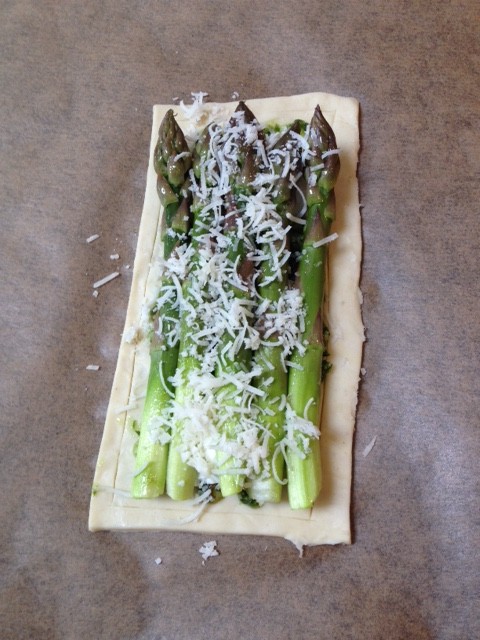
Serve with a green salad with a dressing pimped up with chopped herbs- chives, watercress and basil are all good
IMG_1600 (1)

Something for the weekend?

When we lived in France one of our favourite easy meals was confit of duck legs with a pile of garlicy sautes and a big green salad. You would find ready prepared confit in every market, either vacuum packed or in jars, or in an emergency in tins from the supermarket where they would invariably be on special offer. Now we are back in Somerset this is not a treat I can get hold of easily but I have found that if I slow roast duck legs for a couple of hours the resulting meat is almost as meltingly tender as confit and the skin is as crisp as shattered glass. Duck legs tend to be much cheaper than breast and to my mind have a better flavour and are much more forgiving to cook. Teamed with a pile of spiced red cabbage, which incidentally can be made a day ahead if this suits you, this makes a perfect weekend supper to share with friends.

Duck legs with red,red,red cabbage
Print Recipe
Servings Prep Time
4 25 mins
Cook Time
2 hours
Servings Prep Time
4 25 mins
Cook Time
2 hours
Duck legs with red,red,red cabbage
Print Recipe
Servings Prep Time
4 25 mins
Cook Time
2 hours
Servings Prep Time
4 25 mins
Cook Time
2 hours
Ingredients
Servings:
Instructions
  1. Heat the oven to 160C/fan 140C/Gas 3. Put the duck legs in a large roasting tin and sprinkle with sea salt, freshly ground black pepper and the five spice powder. Put in the oven to roast for 2 hours.
  2. Prepare the vegetables. Thinly slice the red onion. Finely shred the red cabbage. Grate the ginger and chop the apple. When the duck has been cooking for 1 hour, spoon about 3 tbsp of the fat off into a large heavy based pan.
  3. Reheat the duck fat, add the onion and cabbage and cook briskly, stirring for a few mins until the onion and cabbage have started to soften. Add the cranberries, ginger, apple and cinnamon stick and stir well. Season with salt and pepper and add the sugar and vinegar.
  4. Bring to the boil, then reduce the heat to low, cover tightly and cook gently for 30 mins, stirring occasionally. if the liquid starts to dry out add a splash of water.
  5. When the duck has been cooking for 11/4 hours add the potatoes to the roasting pan and stir well to coat in the duck fat. Return the duck and potatoes to the oven for 45 mins.If there is too much fat in the pan spoon some off into a bowl to use another time for roasties. It will keep in a jar in the fridge for weeks.
  6. When the duck and potatoes are tender reheat the cabbage. Spoon someonto four warmed plates and top each with a duck leg. Add the potatoes around the cabbage and serve. Sprinkle with a little chopped parsley if you have it.
Share this Recipe
Powered byWP Ultimate Recipe

Easy peasy lemon squeezy ice cream

With only three ingredients and no tedious stirring involved, this is the easiest most luscious ice cream you will ever make. Simply whip up some cream, fold in a jar of lemon curd( if you have made your own that’s great but a good quality bought one will do fine) and a little lemon zest, tip into a container and freeze. That’s it. No ice cream maker needed and the resulting ice cream will be smooth and creamy and you can scoop it straight from the freezer. So what are you waiting for?

Lemon curd ice cream
Print Recipe
Servings Prep Time
4 10 mins
Passive Time
overnight
Servings Prep Time
4 10 mins
Passive Time
overnight
Lemon curd ice cream
Print Recipe
Servings Prep Time
4 10 mins
Passive Time
overnight
Servings Prep Time
4 10 mins
Passive Time
overnight
Instructions
  1. Pour the cream into a bowl and whisk until it forms soft floppy peaks. Add the lemon curd and grate in the zest from the lemon. Fold together until evenly mixed.
  2. Spoon into a rigid container and freeze overnight or for at least 4 hours
  3. Serve in scoops as it is or with raspberries(fresh or defrosted frozen) crushed with a little creme de cassis
Share this Recipe
Powered byWP Ultimate Recipe

A clean plateful

There is much talk these days about clean eating. This simply means eating only natural unprocessed, preferable organic food and plenty of seasonal fruit and veg washed down with a couple of litres of water a day. That is all brilliant in my book but sticking to it is easier said than done when it’s cold outside and there’s a bacon sarnie on offer made with soft white bread and a dollop of brown sauce. But as it’s January and we are all trying to be good I thought I’d create a dish that feeds body and soul, tastes brilliant and puts a smile on your face. At it’s heart there is farro which is partially cooked wheat grains beloved in Northern Italy, now available in all large supermarkets and healthfood stores. They pack a hearty flavour punch and have a nutty taste without weighing you down. Great in soups, stews, stuffings, salads,whatever. There are also green lentils in there for low fat protein and they also have the advantage of not needing any soaking and are pretty quick to cook. Roasted cauliflower, one of my favourite veggies in winter, adds crunch and a welcome change of texture along with the nuts, cranberries and capers, keeping each mouthful interesting to the last. Don’t be put off by the longer than average recipe list, you’ll probably have most of it in your storecupboard. I like to serve this at room temperature but any leftovers will keep in the fridge for several daysto make a perfect lunch, or just scoop out a forkful as you are passing to keep hunger pangs at bay.
In other news, I have a new facebook page where you will be able to keep up to date with all that is happening in my kitchen, garden and on my travels. And it’s the best place to post comments or pose culinary questions. I look forward to hearing from you.

Farro and cauliflower pilaff with nuts and seeds
Print Recipe
Prep Time
30 mins
Cook Time
20-25 mins
Prep Time
30 mins
Cook Time
20-25 mins
Farro and cauliflower pilaff with nuts and seeds
Print Recipe
Prep Time
30 mins
Cook Time
20-25 mins
Prep Time
30 mins
Cook Time
20-25 mins
Ingredients
Servings:
Instructions
  1. Heat the oven to 190C/fan 170C/Gas 5.Spread the cauliflower florets and red onion in a shallow baking dish. Drizzle over 2 tbsp of the oil, a good sprinkling of salt and pepper and toss everything together. Roast for 20-25 mins, shakking halfway through until the cauliflower is just tender but not too soft.
  2. Tip the lentils into a large pan and cover with plenty of cold water(no salt) Bring to the boil, then reduce the heat and simmer for 10 mins. Add the farro and more water from the kettle if necessary and continue to simmer for a 10 mins until both the lentils and farro are just tender but still with a bit of bite. Drain well.
  3. Toast the cumin seeds in a small dry pan until they start to release their fragrance, then grind in a pestle and mortar. Add the juice of the lemon, the honey, salt and pepper. Add the remaining 3 tbsp of the oil and mix well.
  4. Toast the nuts and sunflower seeds in the same pan you used for the cumin seeds until they just start to catch a bit of colour. Tip onto a chopping board and roughly chop.
  5. Tip the lentils and farro into a large bowl and add the nuts and seeds, cranberries, capers , half the herbs and half the dressing. Mix well. Fold in the warm cauliflower and onion along with any pan juices and fold everything together well. Taste and add more seasoning if necessary.
  6. Divide between 4 dished plates and drizzle over the remaining dressing. Add a lemon wedge and dollop of yogurt on the side and scatter with the remaining herbs. Serve warm or cold.
Share this Recipe
Powered byWP Ultimate Recipe

Warmly spiced roasted pineapple

At this time of year I am often seduced into buying a pineapple as they always look so exotic and cost so little for their size. I take it home and arrange it carefully in the fruit bowl where it sits being admired until it is way past it’s best. I think it’s laziness on my part as it always seems such a faff to prepare it. But I vow to change my ways and have now devised a great no-fuss way of cutting it up. Then to keep things simple I love to roast it with a few warm spices and a splash of orange and serve it warm. Any leftovers also also good eaten straight out of the fridge with a spoonful of yogurt.

Warmly spiced roasted pineapple
Print Recipe
Prep Time
20 mins
Cook Time
25-30mins
Prep Time
20 mins
Cook Time
25-30mins
Warmly spiced roasted pineapple
Print Recipe
Prep Time
20 mins
Cook Time
25-30mins
Prep Time
20 mins
Cook Time
25-30mins
Ingredients
Servings:
Instructions
  1. Heat the oven to 190C/fan 170C/Gas 5. Using a large sharp knife cut the top and base from the pineapple. Stand it upright and slice down the skin all round to remove it, following the curve of the fruit..
  2. Cut diagonal shallow v shapes from the flesh from top to bottom, following the lines of the brown eyes to remove them.
  3. Cut the pineapple in half through the core, then into quarters the same way.
  4. Cut the pineapple into thick slices and put in a large shallow ovenproof dish. Pare thin strips of peel from one of the oranges.
  5. Squeeze the juice from both oranges and pour over the pineapple. Tuck the cinnamon and star anise around the fruit and sprinkle with sugar.
  6. Bake for 20-25 mins, shaking the dish halfway through, until the fruit is tinged brown at the edges. Serve warm or cold as it is or with coconut ice cream or generous spoonsful of clotted cream.
Share this Recipe
Powered byWP Ultimate Recipe

To market, to market

Frome is a town that is growing on me. It has an energy that is infectious and downright happy and the monthly Frome Independent market reflects all that is brilliant about the town. On the first Sunday of each month the town centre is closed the traffic and a huge artisan village is created, with stalls crammed into every corner offering artisan homewares and jewellery, a farmers market, food stalls with too much choice for my greed and live music at every turn. The party goes on all day and the place is buzzing with chatter, laughter and general goodwill. Not wanting to miss out on being part of this vibe we joined in the fun last Sunday to set up our tiny suitcase stall selling vintage French homewares collected over our ten years in France.

IMG_0458
Of course not content to leave it at that I baked over a hundred madeleines to reflect the theme, plus every buyer was sent on their way with one of my recipes- the soda bread, tomato and goats cheese tartlets and almond and orange shortbread were particular favourites with the crowd. If you are in the mood for a bit of light baking have a go at these Raspberry and white chocolate madeleines. They are very good on their own with a cup of tea or on the side with creamy desserts such as lemon posset or crème brulee. Oh and if you feel like a bit of batch baking they freeze really well.
IMG_0457
Raspberry and white chocolate madeleines
Makes about 15

100g plain flour
100g caster sugar
100g butter, melted
1 whole egg, plus 1 egg white
1 tbsp clear honey
finely grated zest of 1 large orange
50g white chocolate, broken up

1 Heat the oven to 190C/fan 170C/Gas 5. Butter 15 madeleine moulds(or use tartlet tins if you don’t have the moulds) and dust lightly with flour.
2 Mix the flour and sugar in a bowl. Put the butter, egg yolk, honey and orange zest into a separate bowl and whisk with a fork to mix. Whisk the two egg whites until stiff. Fold the butter mixture into the dry ingredients until evenly mixed, then fold in the egg whites in two batches using the whisk blades.
3 Divide between the prepared moulds and bake press a raspberry intot he centre of each.Bake for 12-15 mins until golden brown and firm to the touch. Leave to cool in the tins for a couple of minutes, then turn out and cool on a wire rack.
4 Melt the chocolate in the microwave or in a bowl over hot water. Leave to cool for a few minutes until thickened, then drizzle over the madeleines. Leave to set.

Cracking good crackling

Of all the cuts of pork to choose from I have to say that  belly is my all-time favourite. I know it’s a fatty cut but if you roast it slowly much of the fat melts away leaving a fabulously juicy and flavoursome meat. Choosing very lean cuts can be a disappointment as fat means flavour every time. This week I picked up my meat and veggies from our local Food Assembly which is always a pleasure. Not only do I know that the produce is grown and reared locally but I also get to meet the producers and get a few tips from them. Bill the Butcher recommended that I unwrap the belly 24 hours before cooking it to give the skin plenty of time to dry out to ensure good crackling. Finishing off this slow cooked piece of pork on the Barbie gives you the most delicious crunchy crackling. The pork can be oven roasted several hours ahead, cooled, then chilled. Bring it back to room temperature for half an hour before cooking it on the Barbie.

Crackling 5 spice pork

2-21/2kg piece belly pork

4 tsp five spice powder

sea salt and pepper

1 Heat the oven to 160C/140fan/Gas 3. Put the pork in a roasting tin and rub all over with the five spice powder, sea salt and pepper. Cook for 21/2-3hours, until the pork is very tender.

2 Have the barbecue ready with the coals not too hot(wait for them to turn grey with no flames) Put the pork on the barbecue skin side down and cook until the skin crackles, about 15-20 mins. Turn it over and cook on the other side for the same time. Spray the coals with a little water if they start to flare. Transfer the pork to a board and cover tightly with foil. Leave to rest for 15 mins, then cut into thick slices to serve.

Serves 6-8

labneh- gorgeously greek

When we were young and broke my sister Annie and I often made our own soft cheese from yogurt by draining it through a j-cloth overnight and adding whatever spices and herbs we had to hand. We served this in rough terracotta bowls with toasted pittas and the cheapest red wine we could lay our hands on. Happy days indeed.

I have noticed lately that labneh, as this is what it is called, is appearing on restaurant menus all over the place. It’s a bit of a shock to know that you have been around so long that you see a trend coming round for the second time. Still, I reckon after all these years it’s about time I had a go at making it again.

Labneh is a classic Middle Eastern staple and is essentially Greek yogurt salted then strained overnight to remove the whey. This can be served very simply with a slick of good olive oil, or flavoured in  many ways. I love it chilli spiced and scattered with pomegranate seeds, or scattered with torn mint or any other soft summery herbs- coriander, chives, basil, chervil and dill are all good. Follow my step-by-step recipe and or pick one of my other suggestions for finishing it off or go off piste and do your own thing.

  1. Tip a 500ml tub of greek yogurt(sheeps, goats or cows) into a bowl. If you want to go superhealthy use 0%- it works very well. Stir in 1 tsp sea salt. Set a sieve over a bowl or jug and line the sieve with muslin or a new piece of j-cloth. Pour the yogurt into the lined sieve.straining yogurt
    Set the bowl on a tray to catch any leakage then put the whole thing in the fridge overnight until the whey has drained out and you are left with a stiff cheese. Tip the cheese into a bowl and stir lightly.
  2. Heat a little olive oil in a small pan, add 1 tsp cumin seeds and fry for a minute or two until they start to give off their aroma. Add a chopped or thinly sliced clove of garlic and fry briefly. Remove from the heat and stir in a finely chopped red chilli.adding spices
  3. Cool slightly then fold three quarters into the cheese. Spoon into a bowl and scatter with the remaining mix, and a little more olive oil if liked.finishing labneh

Or try these:

a few chopped black olives, a teaspoon of capers and a few shreds of orange zest with a little olive oil stirred through.
a few roughly crushed peppercorns and a small handful of chopped mint
a tablespoon of toasted sesame seeds and a slick of olive oil
a slick of olive oil and a scattering of Za’atar
scatter with chopped red chilli and pomegranate seeds
a drizzle of honey- serve with almond thins


A good loaf

One of the skills I was asked to teach more than anything in the four years of running our cookschool in France was breadmaking. Not fancypants bread, just a good loaf that our guests could make successfully at home with minimum fuss and maximum pleasure. Just going through the processes of mixing, kneading, proving and baking to show how easy it is the make a good loaf was something I never tired of. When we returned to England after our 10 year French adventure I vowed to make bread each week. I have to admit I haven’t stuck to this but I have gradually started to make bread regularly and with a huge sense of satisfaction. We can buy good bread here, notably from the Hobbs House bakery run by the Fabulous Baker boys, but at three quid a loaf it doesn’t come cheap. A big bag of Wessex Mill wholemeal flour costs £1.50 and is enough to make three large loaves, so it really is worth the effort. If you follow my recipe I promise you can’t go far wrong. You can shape the dough however you wish, make rolls or small loaves, or even use it as a pizza base. The little tins I used to make my little loaves were picked up from a flea market but you can buy similar cutely shaped tins from Lakeland.

So reach for a big bowl, follow my recipe and I promise you’ll be in for a treat. You can pick up fresh yeast from bakers or at the bread counter of most larger supermarkets.

Simple bread

Makes one large loaf or 10 rolls

500g strong bread flour. White, brown, granary, spelt, whatever

7g sachet easy blend dried yeast or 10g fresh yeast

2 tsp salt

1 tsp sugar

300-350ml hand hot water

2 tbsp olive oil or melted butter

1 Tip the flour into a large bowl. If you are using dried yeast stir this into the flour. If using fresh crumble this into the flour and rub it in with your fingertips. Stir in the salt and sugar.

kneading bread loaf

2 To get the water to the right temperature mix one third hot from the kettle to two thirds cold. If you are using white flour 300ml should be enough. For granary or wholewheat flours use 350ml. Make a well in the centre of the flour and pour in the water and oil or butter all at once. It’s better to add too much water than not enough as a tight dough will not rise well and you’ll end up with a brick.

3 Mix quickly using a wooden fork or your hands until you have a soft dough. Knead the dough for 5 mins on a lightly floured surface until it feels silky and smooth and no longer sticky. When the dough is ready it will feel springy and elastic.

shaping bread loaves

4 Drizzle a little oil into your mixing bowl(no need to wash), add the dough and turn it over to coat with the oil. Cover the bowl with a teatowel and leave to rise for 1 hour, after which time it will have doubled in size and the dough will spring back when you poke it. Heat the oven to 240C/220C fan/Gas 8.

5 Shaping the dough. Tip the dough out onto a lightly floured surface and knead briefly.

To make a loaf Generously oil a 1kg loaf tin. Press the dough to an oblong the length of the tin and three times the width. Fold it into three and drop into the tin. Leave to rise for 30 mins. Bake for 30-35 mins.

To make a cob Shape into a large ball, put on a floured baking sheet and leave to rise for 30 mins. Slash the top with a sharp knife and bake 30-35 mins

To make rolls divide the dough into 10 equal sized pieces(about 80g each) and shape into balls or drop into well oiled tins shaping as for the large loaf. Put the rolls on a floured baking sheet and leave to rise for 30 mins. Bake 15-20 mins.

When the bread is cooked it will feel hollow when tapped on the base. Cool on a wire rack and eat within 2 days or freeze for up to 1 month.

Just a trim, please

P1040331 P1040341 P1040349

On a fine day at the end of March I scattered a variety of salad seeds into growbags in the hope that at least some of them would sprout and provide us with some tasty leaves. Each morning I would pop into the garden(well, more yard really) to check on progress, give them a bit of a talking to and water when they were looking dry(hardly ever as it’s been so rainy). Results have been thrilling, to be honest, and this morning the scissors came out and some of the leaves got a serious haircut.

Top of the crops was the oriental salad leaves(Mr Fothergill’s http://www.mr-fothergills.co.uk/?gclid=CKSz7rixvMUCFernwgod8j0AV ) which came up a treat and tasted crisp and peppery. The seeds were a mix of mizuna, pak choi and oriental mustards and looked very pretty with their shades of greens and reds. The mixed lettuce(again Mr Fothergill) are also brilliant, as are the mizuna, but I’m letting these get a bit bigger. Apparently, the bigger the leaves the hotter the flavour so these will be good stirred through some spicy pan fried chicken. The wild rocket is still in it’s infancy and to be honest the mesclun is a bit patchy- these are French seeds so maybe they don’t travel well.

The leaves I have cropped should grow again, at least three or even four times which would be marvellous and a superb return on the small amount of time and money I have invested. So if you feel like giving micro-gardening a go, either in grow bags, a window box or any spare container here’s a recipe to get you inspired. I discovered wheatberries last year while working on a scandi food feature and their nutty flavour makes a great base for this salad. If you can’t find them then use farro instead, it’s pretty much the same thing.

Halloumi and wheatberry salad with young leaves

Serves 2

100g wheatberries or farro

1 small red onion, thinly sliced

juice of half a lemon

handful of pistachios, roughly chopped

handful dried cranberries

5 pieces sundried tomato, chopped

good handful fresh mint, roughly chopped

3 tbsp olive oil

good handful young salad leaves

250g halloumi

1 Cook the wheatberries in plenty of water following the pack timings. Drain well and leave to cool. Tip the onion into a large bowl with the lemon juice and mix well. Leave for a few minutes until the onion turns pink. Add the pistachios, cranberries, tomato and mint but don’t stir yet as this will turn the mint leaves brown.

2 Heat 1 tbsp of the oil in a pan, cut the halloumi into six slices and fry quickly on each side until golden. Stir the remaining oil and wheatberries into the onion mix and season with salt and pepper. Tip into a shallow dish and top with the halloumi. Scatter over the salad leaves and drizzle with a little olive oil.