Category Archives: Baking

Winter spice pear cake

Winter pear spice cake
Print Recipe
Servings Prep Time
8-12 20mins
Cook Time
45-55 mins
Servings Prep Time
8-12 20mins
Cook Time
45-55 mins
Winter pear spice cake
Print Recipe
Servings Prep Time
8-12 20mins
Cook Time
45-55 mins
Servings Prep Time
8-12 20mins
Cook Time
45-55 mins
Ingredients
FOR THE PEARS
FOR THE CAKE
Servings:
Instructions
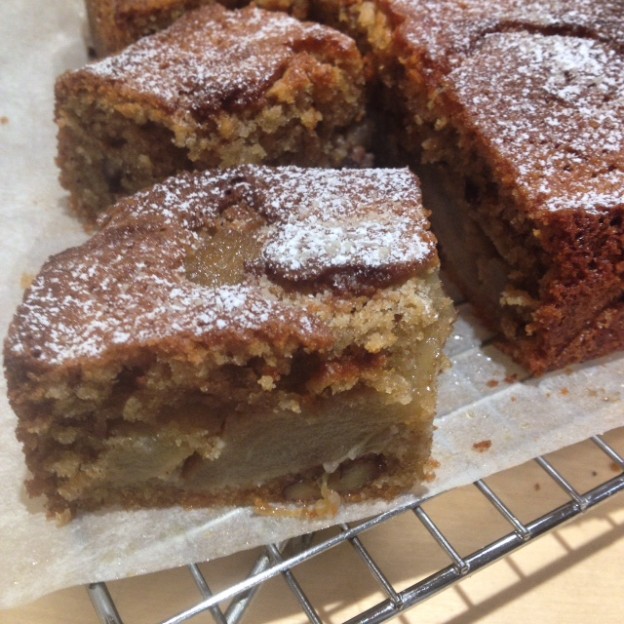
  1. Butter and line the base of a 20cm square cake tin. Heat the oven to 180C/fan 160C/Gas 4. Peel and quarter the pears, then cut out the cores and cut the pears into large pieces. Melt the butter in a pan, add the pears, sugar and spices and cook for 2-3 mins until the pears are just softened and the sauce is syrupy. Leave to cool while you make the cake.
  2. Put the butter and sugar into a mixer or food processor and work until the mixture has lightened in colour, about 2 mins.(or you can do this by hand using a wooden spoon)
  3. Beat in the eggs, one at a time. Add the ground almonds and sift in the flour, baking powder and spices. Fold everything together lightly, then fold in the pecans.
  4. Spoon the cake mixture into the prepared tin and smooth the top. Arrange the pears evenly over the top, then pour over the sauce from the pan. Bake for 45-55 mins until the cake is risen and golden, and springs back when gently pressed.
  5. Cool in the tin for 10 mins, then turn out, peel off the paper and cool on a wire rack. Dust the top with icing sugar to serve. The cake will keep for 2-3 days wrapped in foil.
Share this Recipe
Powered byWP Ultimate Recipe

The answer is pie – Part 2 – The Glorious Pie

Chicken and Leek pie
Print Recipe
Who can resist a good pie?- and this is a very good one. If you have made your own pastry that's all to the good, but if not, it will still be a thing of beauty and everyone will love you for it. Poaching the chicken is a really good wheeze as it not only gives you really tender meat but the stock is sublime. You will have too much so plenty leftover to make a wintry soup, sauce or base for risotto.
Servings Prep Time
5-6 depending on greed 30 mins
Cook Time
2 hours
Servings Prep Time
5-6 depending on greed 30 mins
Cook Time
2 hours
Ingredients
Servings: depending on greed
Instructions
  1. Put the chicken in a heavy pan with the carrots, celery, onion, bay, rosemary, peppercorns and salt. Pour over cold water to come halfway up the chicken. Bring to the boil, then reduce the heat to a gentle simmer, cover tightly and cook for 1-1/4 hours until the chicken is very tender.
  2. Remove the chicken from the pot, then strain the stock. Measure 450ml of the stock (the rest can be cooled, then kept in the fridge for up to 2 days for another dish, or frozen)
  3. Remove all the meat from the chicken and cut into bite sized chunks.
  4. Heat the oven to 200C/fan 180C/Gas 6. Put a baking sheet in the oven. Heat the butter in a large pan, add the leeks and cook gently for 2-3 mins until slightly softened. Stir in the flour and cook for a minute. Gradually add the stock, stirring all the time until the sauce is thickened and smooth.
  5. Simmer for 2 mins, then remove from the heat and stir in the mustard, crème fraiche, tarragon and lemon juice and zest. Taste and add more seasoning if needed. Stir in the chicken, then transfer to a 11/5 litre deep pie dish. Put a pie funnel in the centre of the pie, if you have one.
  6. Roll out the pastry to about 5cm all round than the top of the pie dish. Cut a strip all round the rolled out pastry, about 2cm wide.
  7. Brush the rim of the pie dish with a little beaten egg, then press the pastry strip onto it.
  8. Brush the pastry strip with egg, then lift up the main piece of pastry to cover the pie. Press the edges firmly to seal the pie, then pinch the edges all round between your fingers.
  9. Make a hole in the centre of the pastry with the tip of a knife, then brush the pastry all over with egg. Use the trimmings to decorate the pie as you wish, then brush the trimmings with egg. Bake for 25-35 mins, until the pastry is crisp and deep golden. Serve with a good seasonal green veg such as buttered cabbage, kale or broccoli. A pile of carrots or some roasted sweet potato chips on the side are also good.
Share this Recipe
Powered byWP Ultimate Recipe

The answer is pie – Part 1: the crust

In these dark drear days of January the answer is pie
I haven’t made puff pastry since college days, too complicated, too specialist,cba(can’t be arsed) but rough puff is a different matter. So easy to make, so satisfying, so silky to the touch. And a pie topped with home made pastry is a thing to celebrate- and we have much to celebrate at the moment. My step-daughter Zoe gave birth to a plumptious baby girl last week (hurrah) and when asked what she needed from us when we next visit top of the list was food, particularly the kind you can eat one-handed as greedy little Martha needs constant feeding.
So a pie it is. Chicken and leek I reckon. The filling can be scooped up with a fork and the pastry, well if you cook it well it will be crisp enough to be hand-held.
Before you start make sure your butter is nice and cold. Best to weigh it first, then return the weighed portion to the fridge for an hour if time allows. Well chilled butter is less at risk of melting during handling which can be a messy business. Once made, the pastry can be used straight away in pretty much any recipe that calls for puff pastry, or wrap it in cling film and it will keep in the fridge for several days or freeze to use later. So get this made and tomorrow I’ll give you the recipe for the pie.
If you would love a hands-on session I still have a place or two available on my pastry making workshop this spring which will also cover choux and sweet shortcrust. http://www.marycadogan.co.uk/workshops/ The sessions will be held in the light and airy kitchen of my cottage kitchen in the heart of Somerset and will be very relaxed and informal There is also a breadmaking workshop if you’ve always wanted to master a good loaf. Both are full morning sessions with lunch and plenty of good things to take home.

Rough puff pastry

150g chilled butter
200g plain flour
2 tsp lemon juice
About 120ml cold water

1 Cut the butter into fingernail sized pieces. Tip the flour into a mixing bowl and add a little salt. Add the butter and use a round ended knife to evenly distribute it through the flour.img_2510 img_2511
2 Add the lemon juice and water and mix with the knife to soft lumpy dough.img_2512 Add an extra tbsp of water if needed.img_2520 Turn the dough out onto a lightly floured surface and shape into a square.img_2521
3 Roll the dough out into an oblong about 36cm x 12 cm. Fold the bottom third up and the top third down to form a square. img_2522 img_2524Seal the edges with a rolling pin, img_2527then give the dough a quarter turn and repeat the rolling and folding. Chill for 20 mins.
4 Repeat the rolling and folding twice more(6 times in all), then chill for a further 20 mins.img_2531
Your pastry is now ready to use.

Whole orange and almond cake

fullsizerender-3
Those of you who know me even slightly will know that I love baking. Funnily enough I don’t eat much cake but I just love the process of making one, from the weighing out of the ingredients, the mixing and folding, the amazing alchemy that goes on in the oven as the cake rises and browns, then the finishing it off in a cloud of icing sugar. And of course when friends come over a home made cake is a real treat to share over a cup of tea and plenty of news and gossip. This weekend I am hosting a Macmillan coffee morning, of course to raise money for a worthwhile cause but also as an excuse to bake my heart out. This whole orange and almond cake is a real winner, and has the bonus of being gluten and dairy free so even the pickiest eaters can enjoy a slice. It’s simple to make, stays moist for days and freezes perfectly, even cut into slices. It’s a big cake and will happily double as a dessert with berries and a scoop of cream(preferably clotted, I say!)
img_1607-1

Whole orange and almond cake
It really helps if you have a kitchenaid or other tabletop mixer, or failing that a hand held electric whisk as it is crucial to whisk the eggs and sugar until they are thick and light and this will take at least 5 mins, or a bit longer.
Cuts into 12 good slices

3 untreated oranges
3 large free range eggs
300g caster sugar
300g ground almonds
few drops almond extract
1 tsp gluten free baking powder
few drops almond extract
handful flaked almonds

1 Heat the oven to 160C/fan 140C/Gas 3. Oil and line the base of a 22cm round cake tin. Put 2 of the oranges into a saucepan and cover with water. Bring to the boil, then reduce the heat and simmer for 15 mins, then drain and re-cover with water(this will reduce the bitterness of the oranges). Bring back to the boil and simmer for 30 mins;drain and cool.
2 Coarsely chop the whole oranges, removing the pips. Blitz the whole oranges in a food processor to a fairly fine pulp.
3 Whisk the eggs and 200g of the sugar in a tabletop or handheld electric mixer until the mixture is light, pale and leaves a trail when the whisk blades are lifted.
4 Carefully fold in the orange pulp, the ground almonds and the baking powder, then add the alomnd extract and fold together lightly. The whisk blades are perfect for this job.
5 Pour the mixture into the prepared tin.Scatter over the flaked almonds and bake for about 50mins to 1 hour until the cake is firm to the touch and golden brown. Meanwhile make the syrup.
6 Put the remaining 100g of sugar in a small pan with the juice from the remaining orange. Bring to the boil, stirring, then boil for 2-3 mins until it forms a light syrup. When the cake is cooked pour the syrup evenly over the cake and leave to cool in the tin completely.
7 Take care when turning the cake out of the tin as it is quite fragile. You can dust the edges of the cake with icing sugar for a final flourish.
fullsizerender-4

Mincemeat and apple cake

Ok, so I know that we are supposed to be on the wagon, down the gym and following a blameless diet but before I can start all that there is the question of leftovers, and what to do with them. I can’t just chuck them out, that would be wasteful and along with all the anonymous foil parcels I daren’t unwrap that are lurking in the fridge there is half a jar of mincemeat, a couple of spongy apples and a loads of nuts in shells staring at me accusingly. Why oh why do I always buy so many nuts in shells when nobody eats them? I think it’s the memory of my dad cracking shells from a big basketful on his lap while wearing a slightly wonky paper hat that means Christmas is just not the same without them(or him). And he would always pass me a couple, but never the brazils, they were his favourites. So with family coming for the weekend the only answer to my dilemma is of course cake. This is a pretty hands-free recipe as most of the work is done in the food processor so in a matter of moments it’s ready to fling into the oven. It makes a good sized cake and if you can’t eat it now it will freeze beautifully ready to reward you for losing that first couple of kilos.


Mincemeat and apple cake
Print Recipe
Servings Prep Time
12 slices 20 mins
Cook Time
1-11/4hours
Servings Prep Time
12 slices 20 mins
Cook Time
1-11/4hours
Mincemeat and apple cake
Print Recipe
Servings Prep Time
12 slices 20 mins
Cook Time
1-11/4hours
Servings Prep Time
12 slices 20 mins
Cook Time
1-11/4hours
Ingredients
Servings:
Instructions
  1. Heat the oven to 160C/fan 140C/Gas 3. Butter and base line a 20cm deep cake tin. Tip the flour and spice into the food processor, add the butter, cut into cubes and process to form a crumbly texture.
  2. Add the sugar and process briefly to mix.
  3. Tip the mixture into a large bowl and add the eggs, apples, raisins and milk. Beat together until it all comes together to a soft batter with no dry mix visible.
  4. Spoon half the mixture into the prepared tin and smooth over. Drop spoonfuls of mincemeat evenly over the top, then carefully smooth almost to the edges.
  5. Spoon the remaining mixture over the mincemeat and smooth the top. Scatter with nuts and demerara sugar and bake for 1-1/4 hours until the cake is nicely browned and firm to the touch.
  6. Cool in the tin for 10 mins, then turn out, peel off the paper and cool completely before cutting into generous slices. You can dust the top lightly with icing sugar if you fancy. As this cake contains fresh fruit it will only keep in the tin for 3-4 days.
Share this Recipe
Powered byWP Ultimate Recipe

To market, to market

Frome is a town that is growing on me. It has an energy that is infectious and downright happy and the monthly Frome Independent market reflects all that is brilliant about the town. On the first Sunday of each month the town centre is closed the traffic and a huge artisan village is created, with stalls crammed into every corner offering artisan homewares and jewellery, a farmers market, food stalls with too much choice for my greed and live music at every turn. The party goes on all day and the place is buzzing with chatter, laughter and general goodwill. Not wanting to miss out on being part of this vibe we joined in the fun last Sunday to set up our tiny suitcase stall selling vintage French homewares collected over our ten years in France.

IMG_0458
Of course not content to leave it at that I baked over a hundred madeleines to reflect the theme, plus every buyer was sent on their way with one of my recipes- the soda bread, tomato and goats cheese tartlets and almond and orange shortbread were particular favourites with the crowd. If you are in the mood for a bit of light baking have a go at these Raspberry and white chocolate madeleines. They are very good on their own with a cup of tea or on the side with creamy desserts such as lemon posset or crème brulee. Oh and if you feel like a bit of batch baking they freeze really well.
IMG_0457
Raspberry and white chocolate madeleines
Makes about 15

100g plain flour
100g caster sugar
100g butter, melted
1 whole egg, plus 1 egg white
1 tbsp clear honey
finely grated zest of 1 large orange
50g white chocolate, broken up

1 Heat the oven to 190C/fan 170C/Gas 5. Butter 15 madeleine moulds(or use tartlet tins if you don’t have the moulds) and dust lightly with flour.
2 Mix the flour and sugar in a bowl. Put the butter, egg yolk, honey and orange zest into a separate bowl and whisk with a fork to mix. Whisk the two egg whites until stiff. Fold the butter mixture into the dry ingredients until evenly mixed, then fold in the egg whites in two batches using the whisk blades.
3 Divide between the prepared moulds and bake press a raspberry intot he centre of each.Bake for 12-15 mins until golden brown and firm to the touch. Leave to cool in the tins for a couple of minutes, then turn out and cool on a wire rack.
4 Melt the chocolate in the microwave or in a bowl over hot water. Leave to cool for a few minutes until thickened, then drizzle over the madeleines. Leave to set.